Tuesday, September 28, 2010

Frame Repair Part 2

On to the driver's side which was much worse. The original placement of the hole was barely distinguishable and I ended up placing the washer about 1/8" further inboard than the passenger's side. The provisions in the cab floor should easily absorb the error, but if necessary, I can widen it just a little bit with a small grinder stone.
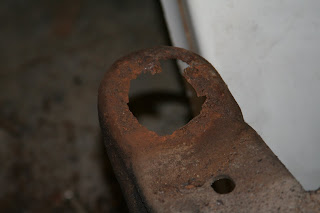
This time, I used the sawzall to radially cut outward from the inside. Then, I hit each pie section with the grinder wheel until it could be broken off with the hammer. Making the hole you see below took an entire grinder wheel per side, but I'm happy with the results.

Since this side didn't take up the whole hour this evening that my wife granted me, I moved on to the passenger's side radiator core support mounting place.
I cut out a large section so that the repair wasn't directly over where the rubber radiator core support mount will be. This is overkill since it will be strong enough, but oh well.
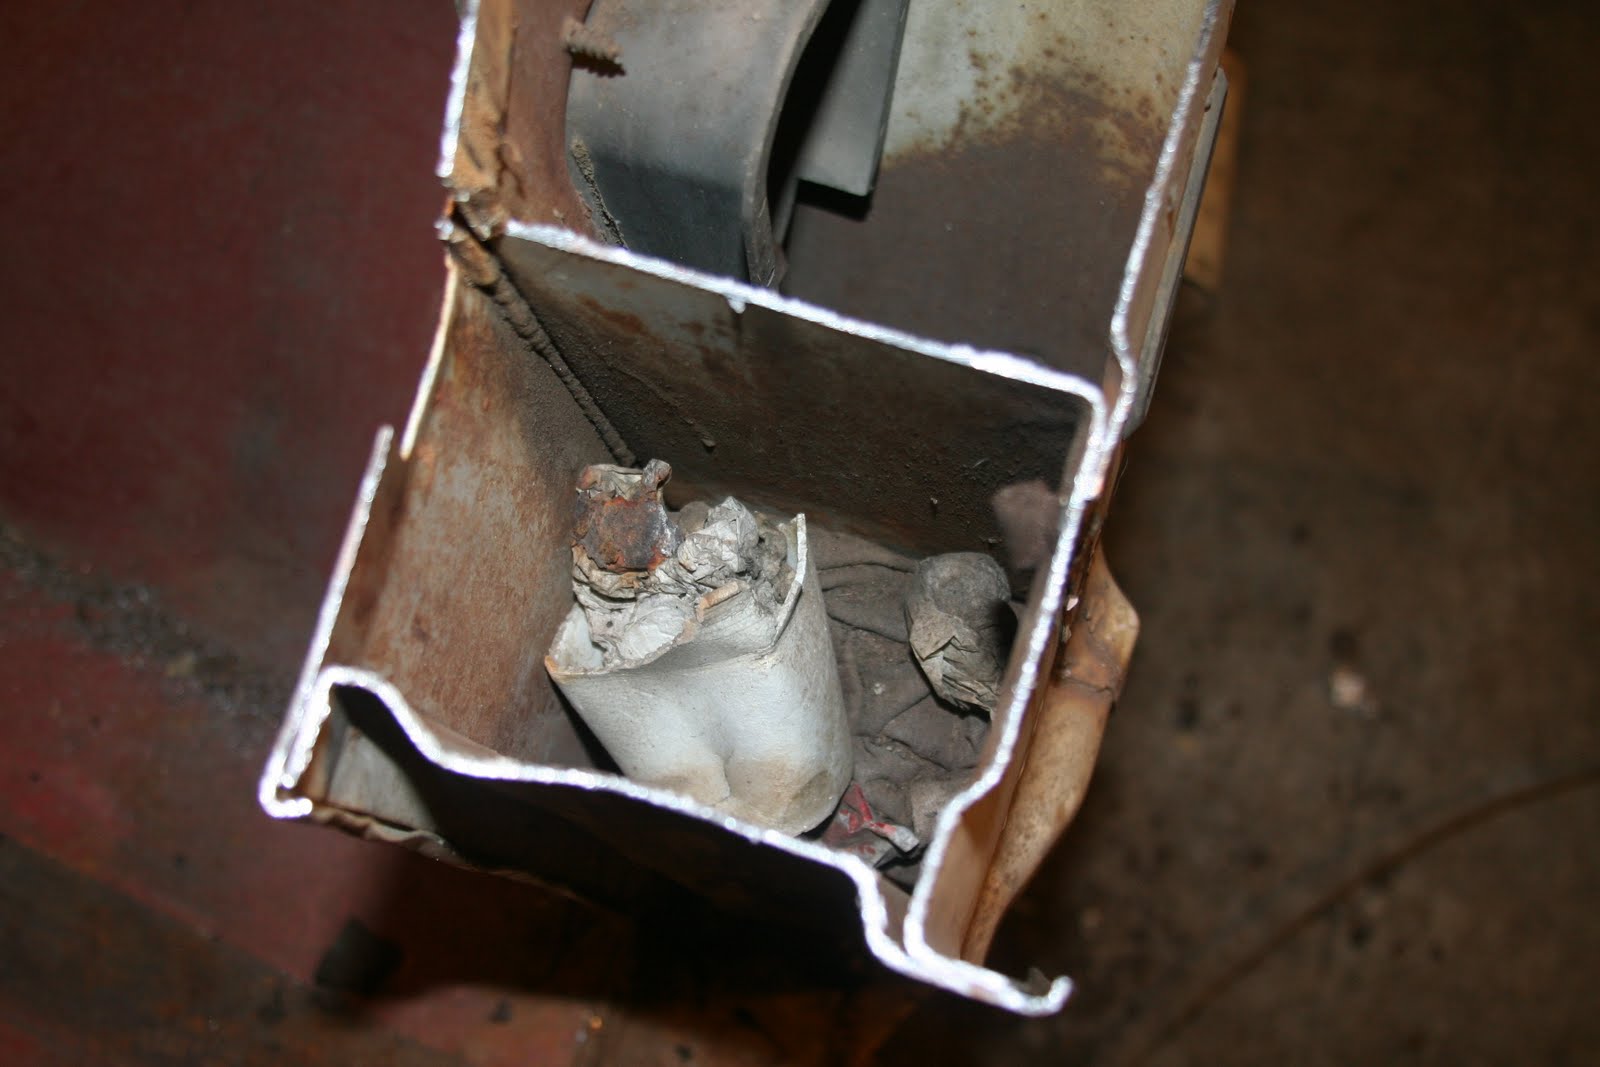
Here's the semi-final repair. I won't drill a hole for the core support mount until I have the other side finished and the core support handy so I can get it right. These holes were originally smaller than the holes for the cab mounts, so there is less margin for error. Once the other side is done, I'll get out the hole saw and drag the core support out of storage for fitment.Time expired before I had a chance to do the passenger's side, so I'll have to be happy with tonight's progress. Once I finish that, I'll flip the frame over and weld all the repairs from the bottom side as well. Then, I'll make room for the Crown Victoria front suspension and stack the frame against the wall to make room in the garage for the wife's car. Winter is fast approaching.

Monday, September 27, 2010

Beginning Frame Repairs

Remember this?:

It's fixed now, on one side at least. That's all I could get done in the time I had this evening. The plasma cutter is down right now, so it took a LONG time to cut out the metal to get it to look like this:
Some people just put the patch panel on top of the rusted section. I don't like that type of repair at all since there's always the chance that rust can form between the panels. So I cut a large hole and welded a thick gauge washer in place of the missing metal. If you look closely in the picture above, you can see the washer on the floor below the frame rail. It is a 1.5" zinc plated washer that was just the right thickness to match up well to the existing frame. I ground off the zinc plating to ensure a good weld. Here's how it came out:

More fresh steel comes home


I brought back the rest of the steel from the blaster. I still need to clean a tailgate and the frame, but I won't be using the same blaster. They are only there M-F 8-5 when I have to work and they are an hour from home, so it's just plain inconvenient.
It cost about 1350 and I didn't have to clean up any sand. I don't know if I'll be doing the frame myself or not. I'm tempted to send it out for powdercoating. I need to make the repairs to the frame and then I can worry about who can strip it. The rust on the door literally happened on the way home. Thank you, Missouri Humidity or some splash of water I hit on the way home...who knows...

Friday, September 24, 2010

5.4L DOHC Teardown

I was told this engine had a blown head gasket. The milky oil would help confirm that diagnosis, but during the teardown, I quickly spotted the source of the contamination. Upon further disassembly, I was pleasantly surprised with it's condition. Usually engines suffer apparent damage from oil starvation when water enters the oil to this level. Even the bearings look great. Unless we find cracks in the block or heads, this will be a easy rebuild. I'll measure out the bore tomorrow morning.
Heads are off:
Do you see the problem in the next two pictures?

There's a freeze plug sitting between the oil pump and the oil pan. Both block freeze plugs behind the timing cover were popped out. My theory is that the previous owner bought the car to Kansas City from Georgia (as he told me) where the coolant was replaced with either water or an unsuitable blend of water and antifreeze to keep the coolant from freezing. When it freezes, it pushes on the block freeze plugs. The ones on the outside of the block are going to be tougher to push out of the block than the ones soaked in oil because the outside ones are rusted in place. Rust inside the coolant passage ways confirms water rather than antifreeze coolant being used. The head gaskets looked fine. I hope the two popped freeze plugs were enough to save the block from the pressure of the freezing water. I won't know until it's inspected by the machine shop.


The crank and rod journals look excellent for the amount of water in the oil. They don't really show up in these pictures, but the bearings show very little evidence of scoring and none of the bearings failed.

How do you make a 460 look small?


Put it on a stand next to a 5.4L DOHC engine.
In nearly every dimension, the 5.4L is larger than the Big Block Ford. In this picture, the 5.4 doesn't even have an intake on it, yet, it makes the 460 look like a baby.
My decision to go with the 5.4 is not based on performance. I'm not looking to build a street monster. While the 5.4 is capable of massive horsepower numbers, in stock form, it's pretty tame. I'll be keeping it tame, but I hope it makes for good conversation. I performed the teardown tonight and will be posting those pics shortly. I also got the bed for the pickup picked up from the blaster along with the doors and hood. Pics of that won't go up until tomorrow...

Thursday, September 23, 2010

MSD Box is Here


The MSD box arrived. This is the box designed to handle the ignition system. It watches the cam, crank sensors and a GM MAP sensor to control timing and fire the 8 individual coil packs. It should be a very simple system. The system's timing is adjusted with a laptop. I am ticked off that MSD thought a serial cable is the best way to connect to a laptop. I'll have to buy an adapter since the last time I bought a laptop with a serial port was 10 years ago...no joke!

Wednesday, September 22, 2010

Found my engine


I found this engine close to home from a guy who said it has a blown head gasket. It turns over by hand now, so barring unforeseen circumstances, it should be rebuildable. I'll have to check it all out and have the heads and block checked for cracks. I ordered the module required to make it fire the coil packs and I'll plan on running a carb on top. It's a 5.4L DOHC engine from a 1999 Lincoln Navigator. When I get the 460 out of the pickup, I'll post a picture of the two engines sitting side by side. I think it will be interesting. Dimensionally, the 5.4 dwarfs the gigantic 460, even though 5.4 liters translates into just 330 cubic inches. It will probably be bored during the machining process which (depending on the amount of material removed) may round up to the next .1L of displacement yielding a 5.5L engine. I can't wait to crack it open, but patience wins the day. I need to get an engine hoist before I can even think about getting it out of the truck. Then, when it's on a stand, we'll see what's inside it.

Monday, September 13, 2010

This Weekend's Progress...


New Pinion support I had to buy because I broke the old one...


I spent plenty of time working, but it was mostly absorbed by cleaning. I did paint some of the parts I sandblasted including the axle center section, seat brackets and pedals with support. I also had some more surprises in the frame where the cab floor mounts bolt to the frame. I think I'm almost done finding rust on this pickup.


The last of the cab is dismembered and removed. Now the garage is full of scrap metal and the floor is trashed:

One of the patch panels I cut out of the old cab. I'll be using on the new cab. It is the support for the back window. Somehow the replacement cab's window support was bent and I'm worried that the window won't be able to seal if I don't fix it. This is overkill to fix a small problem, but it will work. All the outside (white) sheet metal will be removed from this part and it will be put on the new cab:

Monday, September 6, 2010

This post is not for the faint of heart


Tonight I harvested the patch panels from the truck's original cab. It was a bit painful to cut it all up like that, but it really wasn't salvageable at my level of body proficiency. I am going to use the roof, dash, cowl and a couple patch panels from around the cab. I cut off the roof, cut off the dash and cut out the patches I'll need. The rest goes to the scrapper.

Grandpa used to referee basketball and football. Even since I was a little kid, I've thought of this crack as a goalpost on the windshield. Since I won't be reinstalling a cracked windshield, I might as well immortalize it here...


Here's the crack in the weatherstrip that let water in every time I drove it in the rain:

Last inspection:


Some kind of city sticker for the City of Grandview, MO:

Spare distributor cap tucked neatly in the cab behind the seat:


Someone stuck a coffee cup in the access hole for one of the fender bolts:


CB antenna?